Opening a Period
•Once the GL account balances are successfully imported for the period, the period can be opened.
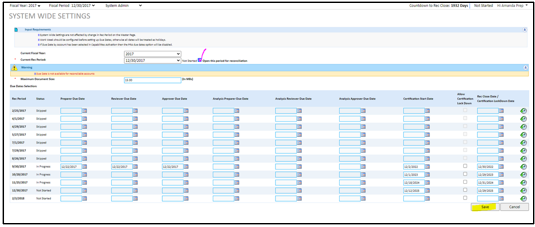
•Go to System Control > System Wide Settings
•Choose the period to be opened from the drop down for “Current Rec Period”

•After choosing the period, there may be errors or warnings that need to be addressed. Warnings may not need action as they are just warnings, but any errors will need to be corrected before progressing.
•The checkbox to the right of the Current Rec Period will appear and can be checked off.
•Click ‘Save’ to save the settings and prompt the opening of the reconciliation period.
Closing a Period
•Once all of the work is completed for a certain period, the period can be closed.
•Make sure to be in the correct Fiscal Period
•Go to System Control > System Wide Settings

•The checkbox to the right of the Current Rec Period will appear and can be checked off.
•Click ‘Save’ to save the settings and prompt the opening of the reconciliation period.
Setting Up New Periods
If there is a need to run different fiscal year cycles in ART, that can be accomplished through the Rec Group feature*. Accounts that are on different fiscal period/fiscal year cycles can be grouped into distinct rec groups which allows each group to:
1.Be on independent fiscal year calendars
2.Be on independent fiscal period-ends
3.Be on independent reconciliation frequency cycles
4.Have tasks in the Task Master module run on independent period cycles.
This feature allows multiple cycles to run at the same time to better suit the needs of sub-entities that follow different calendars.
New fiscal periods in ART may need to be set up because a new period is approaching that isn’t already set up or because an amortization schedule extends out past the latest already set up period, etc.
•Go to Data Import
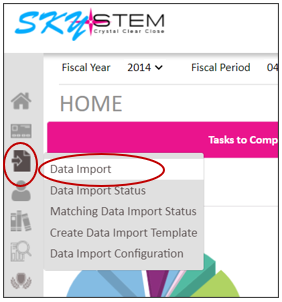
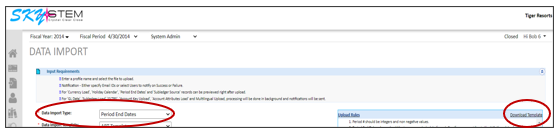
•Select ‘Period End Dates’ from the Data Import Type drop down
•Click on the link to ‘Download Template’
•This will allow you to open the excel import template for period end dates.
•Once the import template is opened, it can be filled out.
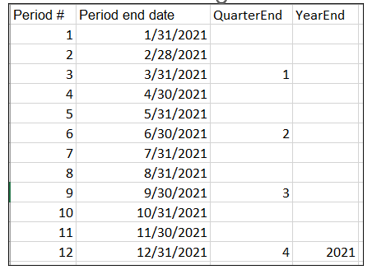
•Unless on an other than calendar year end fiscal year, there will typically be 12 periods in a fiscal year.
•The period # column will typically have 1-12 in it coinciding with those period end dates. For example, in a calendar year end fiscal year, Period #1 will have the Period end date of 1/31/20XX
•The QuarterEnd Column should have the Quarter number next to each quarter end date.
•The YearEnd column should have the Year next to the year end date.
•Once the template is complete and saved, go to Data > Data Import to be able to import the template.

•Select the Data Import Type of ‘Period End Dates’ from the dropdown.
•Enter a name for the import in the field for ‘Profile Name’
•Click on ‘Select’ to browse for the saved file.
•Click on ‘Upload’.

•ART will present the details from the import to be reviewed.
•Once reviewed and deemed correct, check the checkboxes and click on ‘Import’.

•The comment “Records uploaded successfully” will appear.
•Once the period end dates are successfully imported, the associated Fiscal Year must be set up.
•Go to System Control > Create / Update Fiscal Year.

•Enter the Rec Group Name* after selecting ‘Create New’ from the dropdown
•Enter the Fiscal Year Name (i.e. 2020)
•Enter the Start Date (i.e. 1/1/2020)
•Enter the End Date (i.e. 12/31/2020)
•Click ‘Search’*

If not on the Enterprise Plus package, follow these steps:
•Enter the Fiscal Year Name (i.e. 2020)
•Enter the Start Date (i.e. 1/1/2020)
•Enter the End Date (i.e. 12/31/2020)
•Click ‘Save’

•The comment “Fiscal Year Created Successfully” will appear.
•Now, the imported fiscal periods will be automatically associated with the correct fiscal year.